Ramblin' Big & Bubbly Sourdough Focaccia
Ramblin' Big & Bubbly Sourdough Focaccia
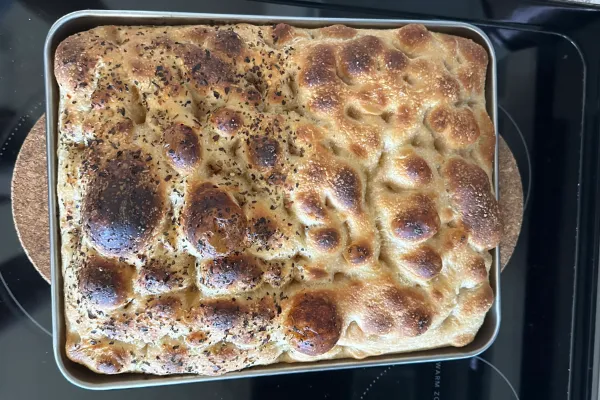
Golden edges. Pillowy center. Naturally leavened and deeply flavorful.
Introduction
There’s something wild about realizing you can turn flour, water, and salt into bread that looks like it came from an Italian bakery.
I used to think baking was lame, took too much time and waiting, but now I get it. You pull that golden loaf out of the oven and BAM, you're hooked! It’s addictive in the best way. It forces you to slow down, pay attention, and trust time to do its work.
If you’ve been keeping your sourdough starter alive (or mostly alive) and you’re ready to make something that looks straight out of an old Italian bakery, this Big & Bubbly Sourdough Focaccia is where it all comes together.
It’s crisp on the edges, soft in the center, and rich with olive oil. The kind of bread that makes you rethink everything you thought you knew about store-bought bread.
The overnight cold fermentation is what gives it those big airy bubbles and that deep, tangy aroma you only get from natural leavening.
Whether you’re just getting into baking or looking for something to change up your weekend routine, this recipe walks you through every step, simple, natural, and deeply satisfying. Because when you create something real with your hands, it changes the way you see everything else.
Quick Overview
Method: Overnight cold proof
Yield: 1 large focaccia
Step 1: Feed Your Starter (Day 1, 8:00 AM)
Goal: Have 180 g of active starter ready for mixing around 2 PM. Give your starter about 6 hours to reach its peak, doesn't have to be at the times noted, I usually bake on Saturday or Sunday.
Feed:
Keep 50 g mature starter (from your jar)
Add 100 g spring water (room temperature)
Add 50 g all-purpose flour
Add 50 g whole wheat flour
Total = 250 g starter
By 2 PM, your starter will be bubbly, domed, and at peak strength.
You’ll use 180 g for your focaccia dough and keep ~60-70 g in your jar. Be sure to feed the left over again so you can keep your starter alive! (Feed the usual 50g all purpose flour + 10g whole wheat + 60g spring water.)
Step 2: Mix the Dough (Day 1, 2:00 PM)
Ingredients:
180 g active starter
450 g spring water
600 g all-purpose (or bread) flour
15 g fine salt (≈ 2½ tsp)
3 Tbsp olive oil
Instructions:
Combine water + starter.
Whisk until the starter dissolves and the mixture looks milky.
Add flour only.
Mix by hand or spatula until no dry spots remain (shaggy, sticky dough).
Cover and rest 30 minutes, this is your autolyse.
Add salt and olive oil.
Sprinkle salt evenly over the dough, drizzle olive oil on top.
Use a “pinch and fold” motion to incorporate (pinch between fingers, fold dough over itself several times).
Continue until the oil is absorbed and the dough feels cohesive again.
Then continue with your stretch-and-fold rounds as written.
Step 3: Stretch & Fold (Day 1, 2:30–6:30 PM)
Perform 3 or 4 rounds total, every 30-45 minutes:
Wet your hand slightly.
Grab one edge of dough, stretch it up gently, and fold it over itself.
Rotate the bowl ¼ turn and repeat 4 times total.
Cover between rounds.
After the last fold, rest the dough 1½-2 hours until puffy, bubbly, and jiggly (about 30-50% rise).
Step 4: Transfer to Pan (Day 1, ~6:30 PM)
Generously oil your stainless pan with 2 Tbsp olive oil.
Gently scrape the dough into the pan — don’t punch it down.
Drizzle a little oil on top and gently stretch toward the corners.
If it resists, let it rest 20-30 minutes, then finish stretching.
Cover tightly (plastic wrap or lid) and refrigerate overnight.
Step 5: Bake Day (Day 2, Morning)
9:00 AM: Remove pan from fridge, keep covered, and let it sit 1½-2 hrs at room temp until jiggly and bubbly.
10:30 AM: Drizzle a bit more olive oil on top and dimple deeply with oiled fingers.
Add toppings:
Flaky salt
Herbs (oregano, basil, rosemary, thyme)
Red pepper flakes
Optional: cherry tomatoes, olives, garlic or caramelized onions
Step 6: Bake (Day 2, ~11:00 AM)
Preheat oven to 450°F (232°C) and plan to use middle or lower rack.
Bake 25-30 minutes until the top is golden brown and the edges crisp.
Check at 20 minutes; if it’s browning too fast, tent loosely with foil.
The bottom should be deep golden when lifted with a spatula.
Step 7: Cool & Serve
Let cool 10-15 minutes in the pan.
Run a spatula around the edges to loosen.
Lift out gently to a cooling rack.
Brush lightly with olive oil for shine and sprinkle a pinch of flaky salt.
Let rest another 10-15 minutes before slicing.
Step 8: Holding & Reheating
To keep warm for up to 2 hours: wrap loosely in parchment or a towel, place in the oven with light on only.
To reheat: 375°F for 5–7 minutes directly on rack to crisp the outside and the warm inside.
Baker’s Tips
Water quality matters: Use spring or filtered water; chlorine slows fermentation.
Be gentle: Stretch and fold softly; don’t knead. The air bubbles make the texture.
Oil generously: That golden crust comes from olive oil on both the pan and top.
Watch the top: Stainless pans brown bottoms fast, adjust rack height if needed.
Experiment with flavor: Garlic-infused oil, roasted tomatoes, or rosemary sea salt take it to the next level.
Sourdough Focaccia FAQ
Do I have to use all all-purpose flour?
Nope! Bread flour gives more chew, but all-purpose works beautifully.
What if my starter peaks early?
Use it once it’s doubled and bubbly, even if that’s earlier than planned. Go at your own pace, my starter is usually fully doubled around 5-7 hours after feeding.
Do I have to refrigerate overnight?
You can bake same-day, but overnight fermentation develops better flavor and texture.
How long does it stay fresh?
2 days at room temperature in parchment or a bread bag; reheat before serving.
Final Thoughts
This focaccia might ruin store-bought bread for you forever...sorry, not sorry. But that’s kind of the point. Once you taste what real, naturally leavened bread is supposed to be, it’s hard to go back to the plastic bag stuff.
And honestly, baking this feels good. It’s grounding, it smells insane, and it lets you know you are capable of more than you think. Even if it looks like flour exploded in your kitchen, that just means you're doing it right.
A few folds, a night in the fridge, and you’ll wake up to something that tastes like patience, effort, and peace. You don’t need fancy gear or a chef’s hat, just curiosity, a bit of olive oil, and the willingness to try.
If this guide inspired you, share it with someone who needs a break from their screen and a reason to use their hands again. It's quite a freeing hobby, that brings peace and a great snack.
Now grab your starter, clear some counter space, and let’s GET THIS BREAD!
Follow The Rambler’s Guide for simple, slow-living recipes and much more! Together, we will get back to what’s real.
